
Contents:
Boost Your Revenue with Klaviyo Integration
Integrate Klaviyo with Kluvos and watch your revenue grow—guaranteed.
The Challenge
Many of your email subscribers go unrecognized as they engage with your website. This issue often stems from data loss, a common frustration for ecommerce owners and digital marketers.
The Solution
Kluvos enhances your Klaviyo data, improving subscriber recognition and capturing their session activities. Our robust user recognition infrastructure bridges the gap left by data loss, ensuring more of your email subscribers (people you already have permission to send emails to) are recognized in real time as they arrive on your site.
The Outcome
Expect a significant revenue uptick from your flows. With improved subscriber recognition, more individuals are accurately placed into your Klaviyo flows, leading to an increased volume of targeted emails. On average, our integration boosts revenue by 30% for browse abandonment and abandoned cart flows. Our beta users, benefiting from our “AI” event tracking, report even greater revenue increases.
How to set up Klaviyo Integration for Kluvos
To get set up with Klaviyo, log into you Kluvos account and head to your Integrations Page.
Click connect to be guided through a Klaviyo hosted integration process.
Once successfully integrated, Kluvos will start sending you three new events:
- [Kluvos] Active On Site
- [Kluvos] Viewed Product
- [Kluvos] Add To Cart
Kluvos UTMs
It is imperative proper global paramters are set on your Klaviyo account. This can easily be done in your settings.
Set a kla_profile_id for all your flows and campaigns. Set the value to Klaviyo profile id as shown in the images below:
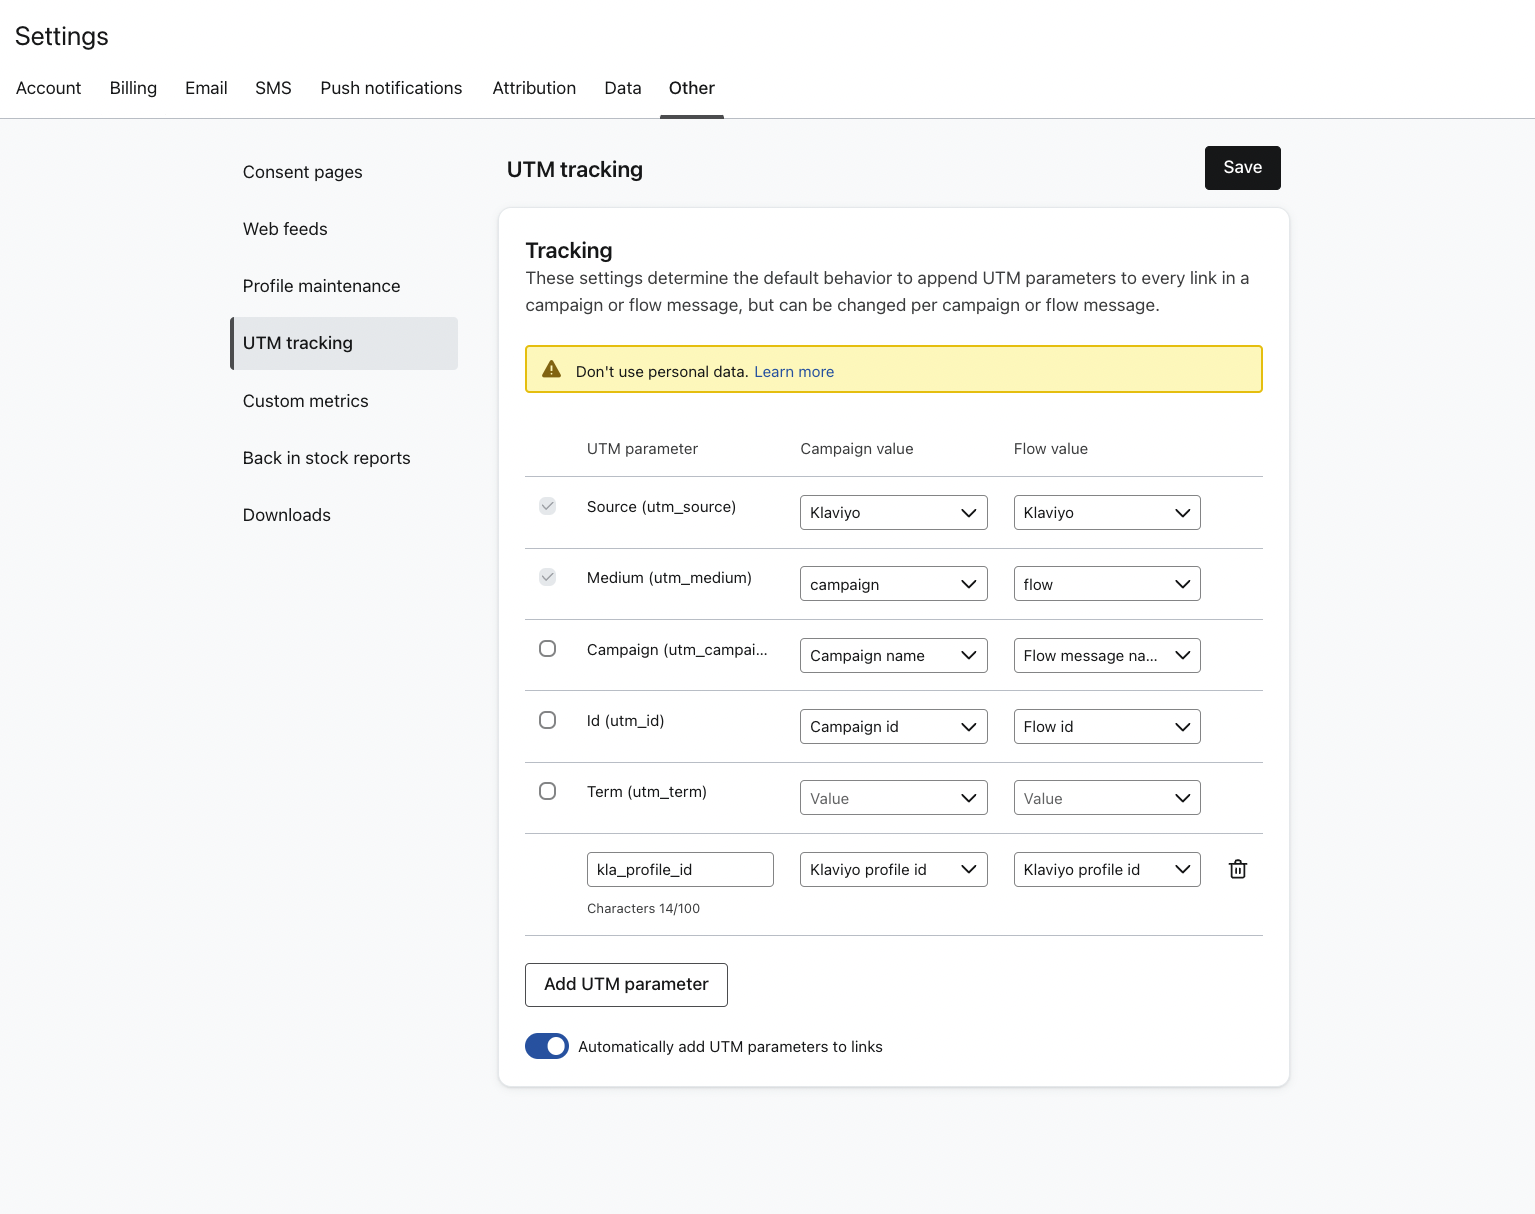 Figure 1: Global UTMs in Klaviyo Settings
 Figure 2: Specific UTM value that needs to be set
Kluvos Events
Once you are integrated with Klaviyo and placed the script from the previous section in your product template(s), Kluvos will send you three new events to your Klaviyo account:
- [Kluvos] Active On Site
- [Kluvos] Viewed Product
- [Kluvos] Add To Cart
Two additional events will be provided if you would like (you'll need to reach out):
- [Kluvos] Viewed Product (AI)
- [Kluvos] Add To Cart (AI)
To use these events, simply clone an existing flow and set the trigger to the corresponding Kluvos event. For example, clone your browse abandonment flow and set the trigger to the [Kluvos] Viewed Product event. Do likewise for your abandoned cart flow setting the event trigger to [Kluvos] Add To Cart. If you do not have an existing abandoned cart flow, copy your Checkout Started flow instead.
For those users who are receiving “AI” events, this process will need to be repeated for each flow and attached to the corresponding “AI” event i.e. [Kluvos] Viewed Product (AI) for browse abandonment and [Kluvos] Add To Cart (AI) for abandoned cart.
In this way, you’ll have created a new flow for each event — resulting in a new browse abandonment flow and a new abandoned cart flow. For beta users using “AI” events, you’ll have an additional browse abandonment flow and an additional abandoned cart flow.
After you have created your new flows and set them to the correct event, you’ll need to set up flow filters which is a critical step in ensuring data isolation.
Flow Filters
Below, we outline the steps for setting up filters in your new flows. We’re here to ensure a smooth integration. For hands-on assistance, please grant us access to your Klaviyo account by sending an invitation to: support@kluvos.com.
Flow filters play a crucial role in ensuring users aren’t placed into flows of the same type at the same time, such as your Browse Abandonment and Browse Abandonment (Kluvos) flows.
Implementing these filters not only prevents flow overlap but also safeguards the attribution process, ensuring that Kluvos flows don’t inadvertently take credit for engagements that should be attributed to other flows. By setting up flow filters properly, you can clearly measure the impact of the data we send. This setup allows for the smooth operation of your flows and enables you to distinguish the added value Kluvos contributes to your Klaviyo account on a daily, weekly, or monthly basis without the concern of overlapping with existing flows.
Video Overview:
Browse Abandonment
Typically, Kluvos users manage two browse abandonment flows: the standard flow set to the “Viewed Product” event, and a secondary flow set to the “[Kluvos] Viewed Product” event. A third, currently in beta, is activated by the “[Kluvos] Viewed Product (AI)” event.
You very likely already have filters for your original browse abandonment flow, which should remain effective. However, to ensure comprehensive coverage, we won’t assume your current filters cover all scenarios. Below is a guide to effectively filter your flows. Here are a few points to consider when setting up your filters:
- Activate exit triggers for events such as Purchase, Checkout Started, or Add to Cart, which remove the user from the flow.
- Verify the user hasn’t recently been in the flow within some specified timeframe.
- Verify the user wasn’t recently in any other browse abandonment flow within same timeframe.
Example: To prevent overlap, each flow must include a filter preventing users who have recently received an email from another browse abandonment flow from entering. This is achieved by setting up a filter like has not received email from $flow = [FLOW_ID] on every flow.
While these filters should suffice for most users, additional customization may be necessary depending on specific needs or scenarios.
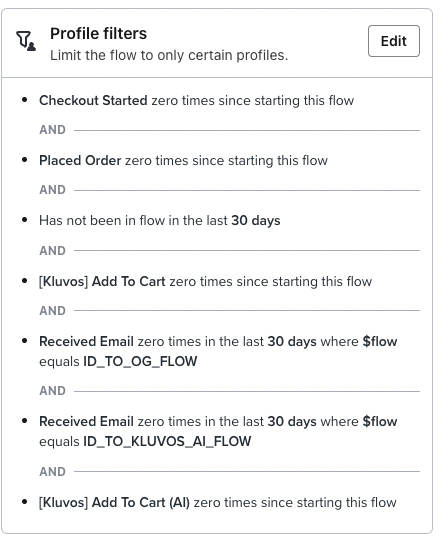 Figure 3: [Kluvos] Browse Abandonment Flow Filters
Trigger event: [Kluvos] Viewed Product
Figure 3: [Kluvos] Browse Abandonment Flow Filters
Trigger event: [Kluvos] Viewed Product
Each Browse Abandonment flow is designed with a critical filter to prevent users who have received an email from the counterpart flow within the last 30-days (your timeframe may be different) from re-entering. Specifically, each flow points to the other with a “received email in the last 30 days” filter. This reciprocity ensures users aren’t sent redundant messages.
Additionally, each Browse Abandonment flow starts with a time delay. To maintain clear separation and prioritize the original flow, set this delay to occur a few minutes after the time delay in the standard Browse Abandonment flow. This setup ensures the original flow takes precedence, even if a Kluvos event triggers first (if this is unclear, please reference video at beginning of this section.
Cart Abandonment
Managing your Cart Abandonment Flows is very similar to managing your Browse Abandonment flows. When setting up filters for this type of flow, consider the following:
- Set events that kick the user out if triggered i.e. Placed Order, Checkout Started
- Verify the user hasn’t recently been in the flow within some specified timeframe.
- Verify the user wasn’t recently in any other abandoned cart flow within same timeframe.
See example below:
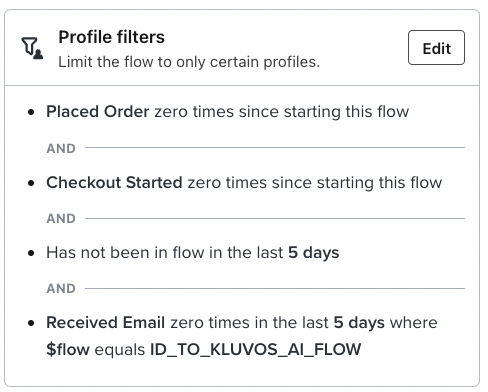 Figure 4: [Kluvos] Abandoned Cart Flow Filters
Trigger event: [Kluvos] Add To Cart
Figure 4: [Kluvos] Abandoned Cart Flow Filters
Trigger event: [Kluvos] Add To Cart
Each Abandoned Cart flow is designed with a critical filter to prevent users who have received an email from the counterpart flow within the last 5-days (your timeframe may be different) from re-entering. Specifically, each flow points to the other with a “received email in the last 5 days” filter. This reciprocity ensures users aren’t sent redundant messages.
For the Abandoned Cart flow, we recommend setting the “has not been in flow” filter to a brief period, such as a 3-5 days, unless specific circumstances justify a longer interval.
Additionally, each Abandoned Cart flow starts with a time delay. To maintain clear separation and prioritize the original flow, set this delay to occur a few minutes after the time delay in the standard Abandoned Cart flow. This setup ensures the original flow takes precedence, even if a Kluvos event triggers first.
Once flows are established and filters applied, the next step is crafting content.
Email Content
Kluvos events contain data that enables the display of dynamic content in emails, similar to standard Klaviyo events. However, variables from Kluvos might differ from those in your original flows, requiring adjustments to avoid broken emails. Here’s what to keep in mind:
Browse Abandonment
Events like [Kluvos] Viewed Product and its AI counterpart mirror the structure of Klaviyo’s standard Viewed Product event. Consequently, emails within your new Kluvos flows should work seamlessly as in the original flows. Nonetheless, employing Klaviyo’s preview tool is recommended to ensure everything appears as intended before activating a new flow.
Abandoned Cart
The [Kluvos] Add To Cart event requires more attention due to potential differences in variables used within this flow’s emails. Adjustments may be necessary to align with the event’s data structure.
IMPORTANT: To ensure users are never greeted with an empty cart after clicking through your Kluvos Abandoned Cart emails, include a ?klv_cx={{ event|lookup:'Token'|default:'' }} parameter on every link within your emails for this flow (See video below for example).
Implementing Event Variables in Emails
Important Note on [Kluvos] Add To Cart (AI) Event
Given the AI event’s nature, there’s a chance an email could be sent to a user who did not actually initate an add to cart event. When crafting content for this flow, consider adopting a generalized tone. For instance, use messages like “We think you’ll like these items...” rather than specific references such as “Here’s your abandoned cart.”
Best Practices
To get the most out of the Klaviyo integration, consider these three things:
- Include Three Emails Per Flow:
- Offer Discounts:
- Double Check And Verify:
Build flows out with a minimum of three emails.
Discounts, especially for abandoned cart emails are strongly encouraged.
Before turning any flow live, it is a good idea to set said flow to MANUAL mode and preview emails as users are entered. This way you can verify that your flow is set up correctly and the content within the email looks good. After verifying, you can turn to LIVE mode.
To reiterate, we’re here to help! Shoot us a message at support@kluvos.com if you’re having any trouble or need additional clarification.